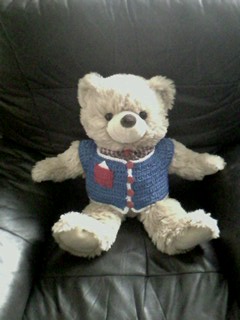
RAINBOW BURST WAISTCOAT. (GILET /
VEST)

Hi Everyone!
I designed this little waistcoat / gilet for my baby Granddaughter - with our summers here in England, it is sometimes too warm for a cardigan but too cold without, so I thought this would be just right!
It is a simple & quick project crocheted all in one piece so no seams to join :o)
It is a simple & quick project crocheted all in one piece so no seams to join :o)
Hope you like it & here is the pattern - absolutely FREE!!!! :o)
RAINBOW BURST WAISTCOAT (GILET / VEST.
YARN : Double Knitting (8ply)
Size 1 Newborn: 6 oddments of different coloured yarn, enough to complete 2-3 rows of each colour
Size 1 Newborn: 6 oddments of different coloured yarn, enough to complete 2-3 rows of each colour
Size 2 3 Months : Ditto!
Crochet Hooks: Both sizes: H (5mm) & G (4mm)
Size 1: Newborn finished size – approx.12cms from back of neck to bottom of point.(at the back) & approx:17cms from underarm to underarm
Size 2: 3 months finished size – approx 16cms from back of neck to bottom of point (at the back) & approx: 20cms from underarm to underarm
Instructions for size 2 in brackets & italics.
Terminology – American
Abbreviations: CH: Chain CHS:
Chains ST : Stitch STS: Stitches SS: SlipStitch SC : Single Crochet DC
Chains ST : Stitch STS: Stitches SS: Slip
EXCELLENT TUTORIAL LINK HERE FOR CHANGING THE COLOUR OF YOUR YARN AT THE END OF A ROW:
http://www.youtube.com/watch?v=WN7Bev7qWp4
http://www.youtube.com/watch?v=WN7Bev7qWp4
TO START – With hook size 5mm (H) CH 31 (37) LOOSELY
ROW 1 – DC in 4th CH from the hook & next 2 (3) CHS 3DC in next CH.
ROW 2 (Both Sizes) Change to a different coloured yarn, TURN & proceed as follows: CH 2 (acts as first DC)
DC in each DC across putting 3DC in centre DC of each 3DC group & in the space between the 2DC at the centre back of neck.(Do not crochet into the DC’s either side of the space!)
ROWS 3 - 5 Change to a different coloured yarn. Turn CH 2 (acts as first DC) DC in each DC across putting 3DC into centre ST of all five 3DC groups
The next Row forms the armholes. As you form the first one, check & see that it is large enough for the babies arm to go through as you may need to do more than 1 CH between the joining STS dependent upon the little recipient :o)
ROW 6 To form the armholes - (Both Sizes) Change to a different coloured yarn. CH 2 (acts as first DC)
DC across to centre of 1st 3DC group, DC into centre ST, CH 1, skip across to next 3DC group & DC in centre ST & each ST across to centre ST of 3rd DC group, DC into centre ST, CH 1, skip to last 3DC put DC in centre of 3DC group & across to end.
ROW 7 (Both sizes) Change the colour of the yarn. CH 2 (acts as first DC) DC in each DC also incorporating the CH under each arm across HOWEVER put 3DC in centre ST of 3DC group at the centre back of the waistcoat DC to the end.
ROW 8 Change the colour of the yarn. CH 2 (acts as first DC)
DC in each DC across putting 3DC into centre ST of 3DC group at the centre back of waistcoat.
ROW 9 Rpt Row 8
ROW 10 Change colour of yarn. CH 2 (acts as first DC) DC across to centre ST under the first arm.
NOW SC into this ST & into each DC until you reach the centre back. Place 3SC into the centre ST of the group of 3DC & then SC across & incorporate the next centre underarm ST & then DC to the end.
ROW 11 Change colour of yarn. CH 2 (acts as first DC) then DC across to centre ST under the first arm again & then SC into the spaces between the SC until you reach the centre back 3SC group. 3SC into the centre ST of this group & then SC again into each space until you reach the centre underarm ST. DC
FASTEN OFF.
Change to hook size 4mm (G)
Attach the first yarn that you used for the foundation chain & first row to the top of front left hand side neck edge. CH 1 SC into same ST then into each ST working down left front. Put 2SC into the
last ST of the bottom left front & continue to SC all round placing 3SC into the 3SC group at the centre back & then 2SC into bottom ST of front right side. SC upwards towards neck edge. SC2 into the
last ST of front right neck edge & continue to SC along back of neck. SC2 into top left neck edge & continue to SC down front left side placing 2SC into the
last ST CH1 & turn. SC back up the left side to just below half way up. Now place 3 evenly spaced buttonholes where desired as follows:
To form buttonhole :CH2 skip a ST, SC. Upon reaching neck edge, SC into last ST & SS into ST to the right. Fasten off.
Attach the same yarn to bottom right front & CH 1. SC into each ST upwards towards neck edge. SC into
last ST at neck edge & turn.(DO NOT CROCHET ACROSS THE BACK OF THE NECK!) CH1 & SC into each ST working downwards. SC2 into the last ST & SS into
next ST to the left. Fasten off..
last ST at neck edge & turn.(DO NOT CROCHET ACROSS THE BACK OF THE NECK!) CH1 & SC into each ST working downwards. SC2 into the last ST & SS into
next ST to the left. Fasten off..
Sew in all ends.
Attach 3 bright different coloured buttons.
FINISHED! :o)
Text and images by A Holden. This pattern cannot be reproduced or distributed -mechanically, electronically, or by any other means, including photocopying, without written permission. Finished products created with this pattern may be used for commercial sale.


